Showing posts with label Technical. Show all posts

Monday, 21 March 2016

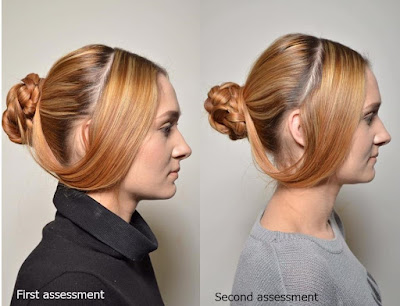
Contemporary Victorian hairstyle inspired by 'American Horror Story'


Products:
-hairspray

Tools: 
-hot rollers 
-hairbrush
-comb
-hair grips

- Center part the front hair to just behind the ear. 


- Fix the red hot rollers on these two sections in order to create volume. 
-Then, using the blue ones, make a brickwork, but only with half of the hair. 
-After that, using the white ones, curl upwards the back hair. 


-Let the hot rollers do their job. 
- Backcomb the front hair. 

- Then, section again the front hair, and with the back hair, create a bun made from 3 sections.


- Roll the front sections and fix the in pins. 


- Spray the hair and that's it!


Wednesday, 16 March 2016

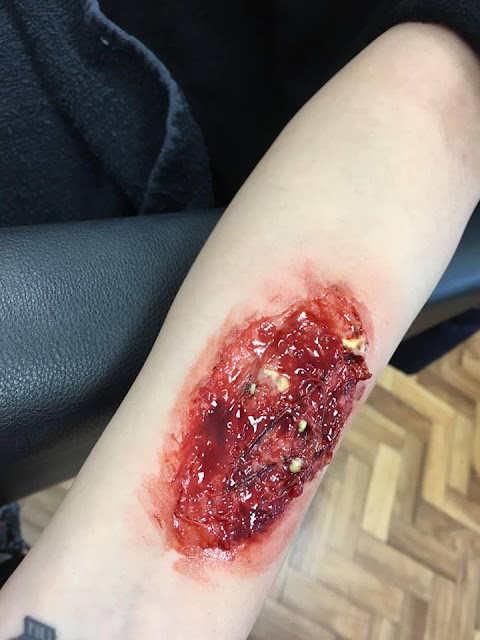
Light scars using moulds


Step-by-step

-Using a baby bud, apply the prosthetic glue on the the area where you want to apply the gelatin. Also, apply the glue on the gelatin as well and stick it on the skin and press it.
-Get rid of those edges by using a baby bud and witch hazel. Rub the gelatin across (from interior to exterior) and the edges are, in this way, burnt.
-Using baby powder , powder the area.
-Start coloring the wound using supra color in red and black. 
-To look more realistic, apply wound filler in the hole with a hair grip, pencil or baby bud.
-Then, with a stipple sponge, apply fake blood all around it. 

It can be removed by pulling off and clean the edges with surgical spirit.


Products used:
gelatin
prosthetic glue
wound filler
fake blood
supra color
surgical spirit 
baby powder 
witch hazel

Health and safety: 

- Make sure the model does not do eye contact with the powder, surgical spirit or witch hazel. 

Monday, 14 March 2016

Continuity assessment -s.w.o.t. analysis-


I believe this assessment was a lot harder than the Elizabethan one. I'm saying that because I, personally, have struggled with precision and details because it's really complicated to make the same makeup or hairstyle, especially, to look the same. The only difference between the first and second assessment I think it was the bun, probably because my model's hair was freshly washed the second time and it was harder to style the hair.
Anyway, I am not complaining because I'm sure the next time it's gonna be better and I had to learn from that. But I have to admit that no matter how hard you try, it's impossible to create exactly the same hairstyle or makeup.


Tuesday, 23 February 2016

Dirt & Dirty Teeth


Step-by-step (dirty teeth)

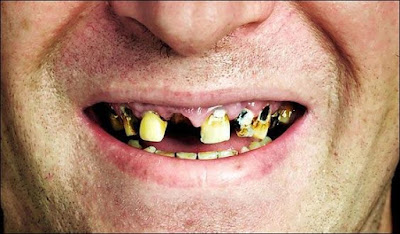
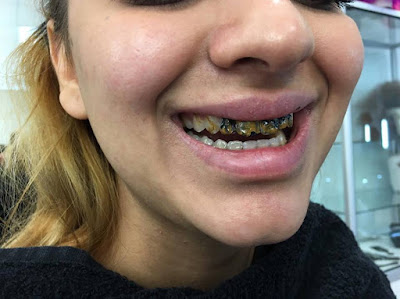
I put my model to smile for me with the teeth out. Using tooth enamel in black and a cotton bud, I gently applied the product on the teeth. The product has got a nail polish texture and dries really fast. It gives the illusion of dental caries and missing teeth. 


After that, I used the same product (tooth enamel), but in a yellowish color to give the illusion of rotten teeth. 


It looks gross, I know. But this is very easy to apply, as well to take off by using surgical spirit and a cotton bud. 

Step-by-step (dirty, muddy hands)


To create this kind of look on the hands, you won't need proper mud, of course! All u need is water and clay which is used for sfx makeup. Mixed with water, the product has a mud texture and color. 
To create the muddy hands look, I applied the product on my model's hand using my hands. 


I dried the hand with the hair drier for 1 minute and then I applied some color spray and fake blood. 


It can be easily taken off by washing everything with water and soap.

Products used:

tooth enamel
surgical spirit 
water
clay
color spray
fake blood

Health and safety: 

- None of the products are allergic, but make sure to work clean. 

Tuesday, 16 February 2016

Sweat, Fever and Black Eye


Step-by-step

Apply moisturizer on the face. This way, it allows to blend better, it also will provide with a shiny surface. There's no need to powder. Then, apply concealer on the red spots or blemishes and under the eyes as well.

With a stipple sponge, apply Supra Color (red) mixed with moisturizer on the face and neck and blend very well (no hard edges) using the fingers. Don't go too hard, as it has to look natural. Then, using a small flat brush, apply on the eyelids as well to create the fever eye look. For good results, apply the color as close as possible to the eyelash. Use the fingers to blend. 
To create the black eye look, start applying from the inner corner of the eye, with dark purple and red cream colors. Create a dark circle under the eye as well.


To create the sweat, use the same stipple sponge and pour some glycerine on the back of the hand. Then tap on the sweaty areas such as forehead, upper lip, around the nose and neck. 


 Also, to create a more sweaty look, you can spray water on the hair and on the back of the neck.
To apply fake tears, you need to ask your model to lay their head back and you just drop in one or two fake tears.


To create the dry lips effect, just apply latex on them, let it dry and color the hard edges with red.


Products used:
supra color
latex
fake tears
glycerin 
concealer
moisturizer 

Health and safety: 

- Clean your hands and the model's face before using the products. 

Wednesday, 10 February 2016

Late Victorian hair


Queen Victoria was a fashion icon in her own right. In the early years of her reign, she inspired the “Apollo Loop” in which a plain or coiled plait of false hair was attached onto wires to create eye-catching loops worn vertically on top of the head.  But the use of elaborate wigs made way for cleaner, gentler looks. The Victorian period of fashion  was about living more simply than the previous era. Hairstyles eventually became more natural and demure with hair parted in the middle, drawn into a bun or coil with curls allowed to fall loosely at the sides of the head. Hairstyles mirrored the aspirations and social changes occurring  within society during this era.  The Industrial Revolution saw the rise  of the middle classes and brought new fashions for clothes and hair.   By the 1850s women wore hairstyles incorporating hairpieces  purchased from the new department stores.  Additionally, women  began using soaps to clean their hair, but this act would strip away oils, leaving the hair stringy and dry.  Products to restore hair’s lustre included vegetable oil and even bear grease. Towards the end of the 19th century, the Marcell Wave invented by Marcel Grateau’s “curling iron,” became a popular hairstyle which enabled to create a more natural looking wave as opposed to a curl. Victorians associated hair with life and love, therefore, it was traditional for women to incorporate lockets of hair into mourning  jewellery after the passing of a loved one.  Also, after 1860, hair was off the face and hair decorations were popular (feathers, flowers). There was a lot of height and short curly fringes were worn by the most of the Victorian ladies. The wealthy ones used to buy hair pieces which were very expensive, but popular at the same time. 
Source: http://chertseymuseum.org/hair
Below, there is my step-by-step hairstyle for the late Victorian period: 
- I made a center part in the front using a comb. 
- Then, using hot rollers, I rolled four pieces of hair each side. 

- After that, I fixed the hair in two pony tails, living some pieces on the sides. 

- I twisted the first pony tail in a bun, the using a curler, I started to curl the sides and the second pony tail. Then I fixed the curls in a loose way, using hair grips.
- I released then the front hair from the hot rollers and I fixed it as I did with the other ones. The fact that I used hot rollers in the front, gave the hair more volume. 

- I also curled the hair from the back and I fixed it as I did with the other ones. The final result:


Elegant, simple and Victorian. 

Burns (third degree)

Although an extensive burn makeup can be achieved with prosthetics, there is a great deal which can be done with directly applied effects materials and color, removing the need to sculpt and make moulds. This is great for a one-off, such as for a low budget movie, a makeup test, building a portofolio, or simply to create effective makeups without using a lot of expensive kit.  However...if the burn is serious enough, might it have been treated surgically with skin grafts and what would that look like? Also, the burn might cause other complications, such as shock and swelling, which in turn can affect circulation and offer further opportunity to enhance the makeup design. There are many kinds of burns.

1: Exposure to heat (first degree burn)


2. Second degree burn


3. Third degree burn


In Sue's lesson we learnt to make a third degree burn using special effects makeup. and below is the step-by-step.

- Put 5 grams of solid gelatin in a bowl and microwave it for like 12 seconds until it melts. Let it cool a little bit, the apply it to the skin with a metal spatula. If you want to be slightly 'out of relief'', you just keep picking the gelatin up with the spatula. Melt the edges with witch hazel using a cotton bud. Dry the area with a hair drier (cool, otherwise it melts again) until the fingers won't stick.


- Powder everything with translucent powder (patting).


- Using red and orange colors from Supra Color, stipple on the area with a powder brush. Try to make as realistic as possible, but be gentle.


- Then, the fun part: start building up the shades by coloring everything with red and dark colors. You can also add fake blood and pus. Tip: for a better blending, use moisturizer and for shine, use vaseline.


And that's it! A 'very beautiful' fake burn made in less than half an hour. 


It can be removed by gently pulling it and cleaning the edges with water & soap.


Products used:

gelatin
fake blood
fake pus
powder
supra color
which hazel

Health and safety:

- Make sure the hands are clean before using the products. 
- Make sure to cover the model's clothes.